 First off, let me disclaim that this is by no means, the authentic or orthodox way of making a Hakama. This is simply the way I do it based on my own research and online tutorials.
 A hakama is a skirt like pants with pleats. The pleats and size of it can vary.
Another signature design of the hakama is the 2 gaps by the side. It is very often worn in cosplays for a variety of characters such as the Shinigamis from BLEACH, Hijikata from Hakuouki Shinsengumi, Kenshin from Rurouoni Kenshin etc etc
*Tutorial Video under cut*
THINGS YOU NEED
Material
| Tools
|
Width of fabric = At least 2 inch longer than your desired Hakama length
Length of fabric = At least 4meter. More would be needed based on your own measurements
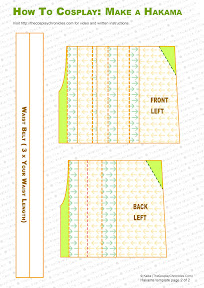
To make learning easier, I have created a very precise but simple paper template that you can download by clicking on the images below. I highly recommend you print them out and fold them as we go a long. Of course in real life, you should alter the size of the template/fabric according to your own measurements as directed in STEP 1 below.
As you can see from the template, this hakama has 7 pleats in front and 3 pleats behind. One of the bigger pleats will fold over to the other side and cover the middle opening of the hakama pants. 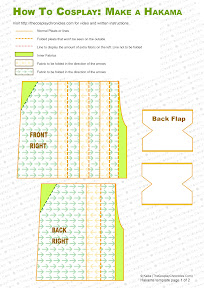
*****
INSTRUCTIONS
STEP 1: Measure & Draft
You will need the following measurement. Use the template given above and modify it to suit your own body measurements.
|

STEP 2: Cut your fabric
- After you are done cutting, fold and iron the pieces. You should get something like this. It is highly encouraged for you to iron the pleats to keep them in place.
![image3_thumb[7][1]](https://blogger.googleusercontent.com/img/b/R29vZ2xl/AVvXsEgfVTxB6-Md8YBgYhMtE85jKXNQAU9gmF8cnktR-x9HxZBkITY-9-mOQkffhoUyv5d0rzeMLMG4xNB7KlgwZQ4Tf-z5fQfoAJ4ybKE3oZbrSwDO3HZ1gKxZhlAzD2fvzla9UIGNT3HSjGOv/?imgmax=800 "image3_thumb[7][1]")
*A little tip: To make the pleats stay flat (and avoid looking like you have a belly), sew short rows of stitch (indicated by the red dotted lines) on the insides of the pleats =)


- This little trick not only helps keep the pleats in place, it also holds the pleats around your stomach area down so you look slimmer. You can also sew a horizontal line at the very tip to keep all the pleats in place.
STEP 3: Sew your Hakama!
- Sew along the red dotted lines. Do the same for both sides of the pants.

After you’re done sewing, it should look like this. Somewhat like a tube.

- Now sew the groin area, attaching the 2 sides of the pants together to form one complete pants. Sew a long the curved area.
- Then fold the edge around the bottom of the pants up and sew it down. This is just to close the edge of the pants up.
- Then fold the two pocket-like flaps at the side of the Hakama inwards and sew along the edge to seal it in place.
- Fold the waist area 1/2 inch down and sew to seal up the waist area


STEP 4: Create the back loop
- Cut out 2 piece of the 'hourglass' like fabric and sew them together back to back.
Flip them inside out to hide the ugly seams and then sew the last opening up. Now fold it in half and you will end up with something like the picture below.


Clasp the back flap and then sew along the red dotted lines


STEP 5: Create the waist sash
- Create the sash.

- The length of the sash should be long enough for it to go around your waist twice and then tie a knot in front. The usual measurement is around 2.5 (or 3, depending on your waist length) X your Waist Length.
- Make a tube with the sash, remember to seal the ends up!
- Find the middle point of the tube then attach it to the centre of the front Hakama


- Now all you have to do is loop the sash through the back loop and tie a knot in front.


===============================================================
Filming this tutorial alone took me 4 different tries because the whole procedure of making and explaining how to make a Hakama was very complicated and I screwed up many times despite having multiple Hakama making experience. And even though I did succeed on my 3rd filming, I then realised the whole procedure was way too complicated for beginners. Not to mention it was also sleep inducing.
I pulled my hair over what was the best and easiest way to teach this complicated pattern. In the end, I came up with that template. Please excuse the noobness of my pattern because I don't study dressmaking and I can't read patterns. I hope you guys will find it useful. You are free to distribute the template as long as you leave my watermark and credit me =)
Anyway, I hope you guys enjoyed this tutorial. Please leave me a comment and tell me how you think about it alright^_^? And yes, this tutorial will appear on the blog and facebook earlier than my Youtube channel because I am now prioritizing the blog over the channel.