Fushigi Yuugi, Live Stage Show & DVD

tumblr_lneflx1NlS1qlldamo1_500

I’m appalled by how late I am in finding this out! And further more appalled at the lack of hype on this production, simply because FY was SUCH a classic Shoujo Manga turned Anime!

Official Site of the Production:

In case you don’t know Fushigi Yuugi, here’s an excerpt.

“ Middle-school student Miaka Yūki feels a lot of pressure to pass the entrance exam for the competitive Jonan Academy. Her friends do not believe she will get in, but she is determined to because her mom expects her to. Her best friend, Yui Hongo, is smart and has also applied to the Jonan Academy. While at the library one day, Miaka and Yui encounter a strange book known as The Universe of the Four Gods. Reading this book transports them into the novel's universe. However, Yui is transported back to the real world almost immediately. Inside the novel, Miaka finds herself the Priestess of Suzaku, destined to gather the seven Celestial Warriors of the god Suzaku in order to summon Suzaku and obtain three wishes. She falls in love with the Celestial Warrior Tamahome, who eventually reciprocates and Miaka's desire to use a wish to enter the high school of her choice begins to shift towards finding a way to be with Tamahome. Yui, who is also drawn into the book when she was trying to help Miaka to come back to the real world, becomes the Priestess of Seiryuu, working against Miaka out of jealousy over Tamahome and revenge for the humiliation and pain she had suffered when she first came to the book world. "

Excerpt from Wikipedia

Yes, it’s a pretty typical girl-in-magical-world kind of story. Very similar to Inu Yasha ahha. But it was a classic shoujo manga I grew up with >////< Now you know why I’m called Kaika ahhahaa.

Here are some cast photographs.

tumblr_m2lqzcWD571qbbpyfo2_250tumblr_m2lqzcWD571qbbpyfo4_250 (1)tumblr_m2lqzcWD571qbbpyfo3_250

I’m a little sad to observe that the production budget had probably allowed this stage show to be less impressive than it could be. And as a Cosplayer I’m also a little sad to observe how lack lustre the costumes looked. But as Reiko pointed out, the actors were very in character, which is good =)

Check out some of the trailer videos!


Videos uploaded by eizofly

You can purchase the DVD here! The production house has also done other stage production for series so remember to check them out!

How I made my Mogami Kyoko Prisoner Velvet Wings

I am SO LATE in doing this entry! But anyway I’m finally here to share how I did the black wings for my Mogami Kyoko cosplay of Fuwa Sho’s Prisoner PV.

Click here to view the photoshoot photos.

Firstly, it is a pair of movable Velvet wings. What do I mean by ' velvet wings' ? Basically, most of the feathers used on this pair of wings is created entirely out of Velvet. Yes that's a fabric, a cloth, not feathery at all. But I bet you wouldn't have realised / noticed it if I didn't tell you xD

(The feathers kinda came out from all the jostling and it shows in this picture ;_; )

Each single velvet feather is made individually by hand. So while it is A LOT cheaper than feathers, it is also A LOT more tedious! I eventually chose velvet over feathers not because of the cost but the advantage in storing and transporting of the prop.

IMG_7124IMG_7126

This is how the wings look laid flat on the floor and without the harness. Some feather boas are used on the top and middle part to help make everything look more realistic.

I wasn't a fan of what they describe as ' tombstone' wings. Basically cardboard wings that are flat and shaped like a tombstone. So after some anatomy research on winged animals and how other cosplayers do their wings, i came up with this simple structure. Unfortunately though, since it was my first attempt at making wings, I have to say it didn’t turn out as well as I hoped =(

IMG_5423IMG_5429

This is the harness that I wear on like a haversack. It is made of compressed wood board, pvc pipe, cable ties and hot glue, so professional I know =x And then I made a fabric tube in matching colour (of my dress) and run the fabric tube through the harness. In the 2nd photo you see me half way through spraying it black on strategic parts just in case any part of it gets seen.

IMG_5413

The internal skeleton.

IMG_5388IMG_5386
Material used for the skeleton  was this plastic rubbery tube thingy that people use with sliding glass doors. I'm sorry I don't know it's technical/official name but maybe your local DIY stores can help. I think it cost me $8 /1.5m and it was chosen for it's flexible yet sturdy nature because I think real wings should flap ahha. It is also lightweight.

The plastic can be pretty hard to bend with hands alone, so at areas that I really need it to bend at a specific angle, I melt the plastic a little with fire then sculpt it with my hands.

IMG_5411IMG_5412

And because I wanted some parts of the plastic tube to be attached together like paper held together by paper ring, I use a heated nail to scorch a hole through it.

IMG_5426IMG_5425

Hehehe, hot glued everything Open-mouthed smile The 5 cable ties that are hot glued onto the cork board is to create loops for my fabric tubes (the thing that allows me to carry the wings like a bag and it goes around my abdominal ).

IMG_5414IMG_5419IMG_5416

Cable ties wrapped around strategic parts of the skeleton to hold the string inside it in place. Yes, I love cables ties and I’m such a kitchen cosplayer >/////<

IMG_5415

Because my main concern is on the storage and transporting of the wings, I made almost every single part of it detachable. In this pic you see the plastic tubes (the translucent one) inserted through the PVC and you might notice how it isn’t actually put together.

IMG_5407

Here, a black cable tie has been tied to hold both the tubes together. The shorter tube works as a support for the inverted ‘L’ shape and without the back cable tie, the whole structure would fail.

IMG_7127

This meant I can cut the cable tie and roll everything into a convenient bundle then set it up again when I need to cosplay/shoot.

IMG_5406
This is how each wing skeleton looked like.  I recommend extending part 'A' to be longer and higher so as to create a more majestic looking pair of wings. My recommended skeleton is outlined in green.  My current one just looks a tad weak because it's not high enough=.=|||

To facilitate snaking in crowds, I made my wings 'swing-able' so I have the option of closing and opening it when I want to. As you can tell, the plastic tubings are inserted through the PVC tubes freely, this is what makes it 'swing-able'. But having swing-able wings also had it's fair share of trouble because the wings wouldn't stay still for pictures =.=;; Oh wells...

IMG_5389IMG_5391

Here’s a miniature trial version of the wings that I made to test the physics before making them in full scale. Here you can sort of see how I attached a string to strategic points of the wings and then made it go through the straw. When I pull the string through the straw, I can open the wings. So if there’s one advise I can give to any new cosplayers, that is to test and trial on inexpensive materials first before moving onto the real thing!

Check out the video above. I'm sure it would have been much better if i used pulleys or some more advanced hardware but I don't have those DIY knowledge ^^; And that pretty much sums the skeleton up.

On to the wings! The base of the wing is basically a big piece of velvet that acts as a pillow case over the skeleton.

IMG_5404

First I placed the skeleton over a big piece of Mahjong paper and drew what I visualise to be the right size and pattern of a wing. After I’m satisfied with what I see, I cut the paper out and use it as a template.

IMG_5405

Place the paper template onto the velvet and cut 2 sides for each wing. I then stapled around the edge and kind of made it into a pillow case for the skeleton. Of course, I cut 4 pieces out and made 2 sides of the wing pillows. I’m sorry if the photos don’t explain as much, I was in SUCH a rush when I made it, I didn’t have the luxury of time to snap progress photos.

Now to the feathers!

IMG_5458
To make the feather, first draw and cut out the rough shape of a feather on velvet. Then use a permanent silver marker to draw strokes that mimics real feathers on it.

IMG_5434

Here are some photos of the ‘feathers’ before they were drawn and burned.

As not all the feathers on a wing has the same size, it is essential to take note of roughly how many 'small' and 'big' feathers you will need. The actual amount of feathers needed ultimately depends on the size of your wing.

IMG_5433

In the above photo I laid my pre-burned feathers onto the paper template to better understand how many feathers I need.
IMG_5430

Later on I found out that it was easier to just draft with a slope like this and make feathers that goes from small to big progressively.

IMG_5476

Then I just burned the edges with a simple candle. Be careful while you are working with fire and becareful not to inhale too much of the toxic gas. I had to burn so much of it at one go that I even felt physically dizzy and my mom was visibly upset with me for making the whole house smell like plastic. But then my mom was nice enough to not comment too much and allow me to continue since she witnessed how much effort I poured into it.

IMG_5474IMG_5462IMG_5457

Some random photos to show off how real I thought they turned out *proud* XD.

IMG_5467

Now lay them on top of your ‘pillow case’ and glue it down with your glue of choice. I think I used UHU glue and hot glue.

 IMG_5470IMG_5473

After you are done, glue feather boa to the top edge and the side close to your back.

IMG_5479

This is how it looks like from the back, not too nice.

IMG_5480

So I cut more feathers and stuck them to the bottom area.

I forgot to take any pictures of the harness (the wooden board thingy) but I also covered it with black velvet and feather boas to make the wing look seamless.

I’m sorry if my descriptions were bad for this and I probably left out a lot of details but I hope it gives you an idea of how such wings are done. Do remember to leave me a comment and tell me what you think! This entry took my so long to put together xD

Matryoshka Cosplay PV (teaser)

I’m here to pimp Cvy & XiaoBai’s Matryoshka Cosplay Teaser PV! Remember to pop over to their original channel to subscribe and comment!

Every little detail is uniquely Singapore's own landmark, occurrence and fact but a teaser a teaser's time, this is all we have included and trust us, we have more ideas than what appear here, do share with us too and we may integrate in the full version! Also if you are an artist or animator, send us (sprinklemethis[a]gmail.com) your interpretation, if is included you will be properly credited!
And we will, of course, pay tribute to the original Matryoshka pv. It's ambiguous form allow us to be inspire and accomplish something more than just.. looking nice.
As subtle as our intentions are, are u able to find or interpret some of the animations?
+++
Drawn and animated by Cvy and Xiaobai
Photos taken by Adrian Song [
http://songster69.deviantart.com]
Miku: Cvy [
http://cvy.deviantart.com]
Gumi: Xiaobai [
http://xiaobai.deviantart.com]
Based on Hachi's Matryoshka (マトリョシカ) [
http://www.nicovideo.jp/watch/sm11809611]
---------------------------------------------------------------------
For our foreign friends, here is a condensed list of trivia to identify ;)
---------------------------------------------------------------------
(1) Blinking Stamford Raffles statue - founder of Singapore
http://en.wikipedia.org/wiki/Stamford_Raffles
(2) ERP - electronic road toll system
http://en.wikipedia.org/wiki/Electronic_Road_Pricing
(3) MRT overcrowding
http://theonlinecitizen.com/2011/11/mrt-overcrowding-shows-a-startling-lack-o...
(4) Singapore's tropical climate and unpredictable weather
http://wiki.answers.com/Q/What_is_the_climate_like_in_Singapore
(5) Graffiti artist, Oliver Fricker's name written on the second train that passed
http://friskodude.blogspot.sg/2010/06/oliver-fricker-graffiti-artist-gets.html
(6) Old man representing "My Grandfather Road" along with traffic lights stickers vandalism
http://sg.news.yahoo.com/vandal-behind-mystery-graffiti-signs-arrested.html
(7) "Just Making An Aesthetic Statement" written on traffic lights stickers
http://www.tnp.sg/content/it-vandalism-or-art

SKIP BEAT Prisoner MV (LALAX cosplay)


If you can't watch it, CLICK HERE to watch on youtube.

HOW DID I MISS THIS?!!?!

Anyway, this is China based Cosplayer LALAX's Cosplay rendition of the song "Prisoner" by Fuwa Sho (Voice: Miyano Mamoru) from the hugely popular Shoujo Manga turned Anime and Drama; SKIP BEAT. series

Shakugan no Shana III (Final) Photoshoot

xQPHO edit-001  
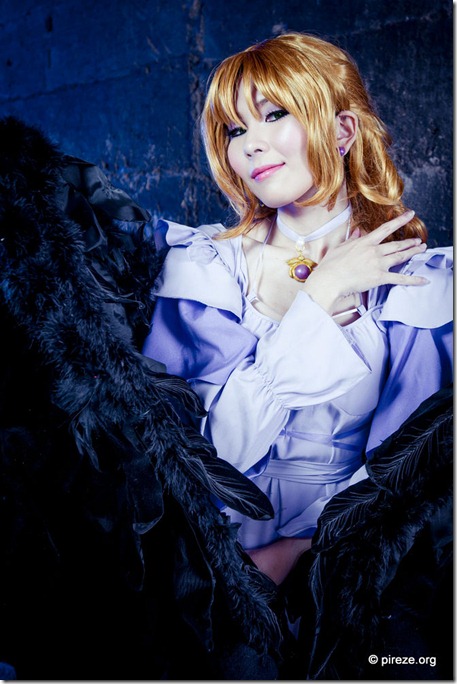
Shana: Kaika / Elpheal
Photos by: Brian Lim
Pyrotechnics by: Nutcase23 & Shane
Helpers: Reiko & Sara
Wig: Assist Wigs
Contact lens: IszoCircleLens

And so I spent the last Saturday of 2012 celebrating my love for Shakugan no Shana with help from a bunch of wonderful people. It was such a long and tiring shoot and we did so much amazingly fun stuffs it almost feels surreal

I shot my long awaited costume of Shana in the final season. It is a white gown with red and silverish lapel design around the chest area. Relatively simple it seems, but as usual, was not. I'll do a separate post about the costume if you guy are interested. Comment and let me know!

To be honest, I've never been a fan of Gown cosplays but Shana had so much character and action in it, I couldn't stop myself from liking it. Of course, being a Shana fan girl didn't helped either xD. 

578629_437489606288368_144803416_nIMG_1767387102_414228305281165_663257867_nphoto 2521467_464879223549406_452742528_nphoto 1 (2)

If you have been following TCC's Facebook page, you would have seen me drafting the gown 6 months ago. And the socks were bought 1 year ago in Taiwan xD I also made 2 version of the same gown. One full gown and one torn version. Mega thanks to Reiko for helping me to rip the edge of my skirt on the shoot itself xD *kisshu reiko*

IMG_3501

Awesome crew of the day xD!

The day started around 3+ where we all met up, self introduced, ate a little and cabbed down to the location. Then with the help of Reiko and Sara, I changed into my first costume; the white gown in its complete state. 

Photo1

Our reference storyboard of the day. 

After a walk up the longgggg flight of stairs , we rested a while and then started the shots of Shana in black hair. The pensive shots of her waiting and praying for something to happen to give her a chance to escape. 

  737460_398125616943071_2029664952_o

We also tried to simulate the scene where Seireiden was under attack and the rinne maids were leading Shana away to hide. Because we wanted some movements in the hair and gown , I tried my best to incorporate more movements into the running. But running with that pair of shoes was hard, it kept slipping T. T

741276_398560766899556_372836828_o

Pardon my face but this was the only good shot out of our 50 over shots >.<

image

And then we did the scene with Shana on the ground. Where the castle was attacked and came down on them. 

Overdid the DI on this ...

_BRI0802_kaikaedit2

Mega thanks to my assistants of the day, Reiko and Sara for being so helpful and enthusiastic. Any cosplayers who have done shoots before would know how lovely it is to be pampered by helpers who are as awesome as them! It was great to have someone of the same gender help spray insect repellent on me, pull up my gown, flip my hair and dress xD 

photo 3 (2)

BTS photo taken by Reiko. Poor Brian had to get on his knees to get the take haha. Then again, I also had half my face on the floor for this xD

565986_10151445627427517_934843163_n

More BTS photo taken by Sara, who also couldn’t resist adding some captions LOL. Yes, the entire crew now calls me a ‘tyrant’ because I have too much inputs and requests =X

Then I changed my wig and we did the action shots! Yes! It's finally the burning hair blazing eyed hunter Shana!!

702272_10151445610452517_1219719447_n_BRI0826

For the most part of the shoot in the day, we were doing these. So full of nonsense xD 

8330257502_969c317f9d_o

Higher res here

This was the scene we were sort of referencing to, Season 3 episode 8. Shana finally freed from her bondage and determined to stop Yuji! It was such a simple yet kakoii moment that i couldn't resist cheering!

IMG_2127

Especially after watching Shana go through the agony of getting kidnapped and losing her overwhelming power. It must have been so humbling to suddenly have your powers taken away and find yourself at the mercy of those you use to hunt. 

image

50 over takes and only one shot made it X__X. We initially tried to do a static pose and have Sara and Reiko throw parts of my wig and skirt for me but the results didn’t turn out as we hoped. So we went back to the good old method of getting the cosplayer to twirl herself. 

Then came the more exciting part of the shoot, working with fire. Truth be told, even though I am a huge Shana fan girl, shooting with real fire has never been on my list. But Brian proposed that idea and got pyro enthusiasts like Nutcase23 and Shane on board so I thought I'd just go with the flow. Fire sounds cool ( and scary) anyway!

We started with something simple first, Shana with her flaming sword. The initial agreement with Brian was that the boys would hold the sword and then we would try to photoshop me into the picture. 

737252_397662630322703_529861302_o

But I still ended up holding the fire sword that day LOL. The katana is a normal wooden prop loaded with flammable fluid. 

Please be advised that this activity is DANGEROUS and please do not attempt to replicate it without safety precautions or experienced personnel around. We actually filmed some BTS videos of the flame shots and I'm dying to share it with you guys. But after some internal discussion with the crew, it is decided that for safety reasons, the videos will not be uploaded. Sorry >_<!

Anyway back to the shot. 

So yes I was the one who held on to the flaming katana and it is hot. Not as hot as I thought it would be but fire being an uncontrollable element was still capable of turning its’ back on you when the wind changes direction. So for the first take , my hand had a brush with the flame when it was drawn back by the wind towards the hilt. Thank goodness orange flames are harmless if it's only a quick contact. 

And as if working with real flames was not difficult enough, we also had to mix in movements of the hair and costume. Since every loading of the fire only last for a short while , it was an 'action' filled 10 seconds for everyone.  photo (1)

I would get into my position while Nutcase loads up the katana and then flame it up. As soon as the flame was up Brian would press his shutter non stop to capture every possible moment. Reiko who was in charge of throwing my wig and garbs would keep throwing them and Shane who was in charge of making the flames look "dynamic" would be fanning non- stop with all his might. As soon as the katana was loaded up, everyone was just so busy it was actually a very funny scene to behold xD 

Then we did a couple more crazy flame shots. Each pushing the safety margin more than the previous oTL. Again I reinstate that fire is DANGEROUS, please do not attempt this without any safety precaution. 

xQPHO edit-001

The flame wings were done with a real fire torch using the light painting technique. Again, can't show you guys the BTS Video. But to give you an idea of how it's done , I drew a comic. 

photo 1

Yes, within the 10 seconds (20 actually because each wing took 10secs) it looks like Brian’s just randomly waving the torch in mid air and nothing’s happening. Here is Brian the photographer's explanation on Facebook.

image


737381_399991236756509_1237392573_o

JUDGEMENT !!!!

In season 3, Shana’s powers levelled up and she was able to manipulate her flames in various forms. This is Brian’s interpretation of that particular scene. The flames in this picture are mostly real but have been enhanced. The eye in the sky was done by compositing images from this shoot.
qsJZF (1)

And the last flame photo of the day was me on the ground, surrounded by fire. Yes, I haven’t shown my mom any of the pictures least she ban me from cosplay xD This scene is a re-creating of the other one on top but with flames xD.

As I briefly mentioned above, In this particular arc Shana was kidnapped and had her powers taken away. She had no choice but to bide her time until she could have a chance at escaping. When the big chance finally came, she was injured by the fallen blocks and couldn’t move. This scene was all about Shana’s exasperation with the situation and her desperation to do something, anything!

Even though it was just a short scene but I felt her emotions so strongly! Yes, not everyone gets kidnapped by their lover and have their powers taken away. But how many times in life have we felt like we’re being caught in a situation we hate and no matter how hard we fight against it, we lose. And when you finally get the chance to do something to change the situation, that one chance you have been waiting for so long… you can’t move.

Commie-Shakugan-no-Shana-III-09-91C48870.mkv_snapshot_15.03_2011.12.04_15.58.52image

The scene we were trying to recreate.

photo 2

Yes, that particular scene was a bitttt crazy but rest assure, we had all the safety precautions taken. As you can see from the comic above, I was half surrounded by the fire made by Nutcase while Shane was furiously fanning it on my left.

Even though it was a relatively dangerous scene to shoot I was thrilled to have the chance to be, just a teeny weeny bit closer to whatever Shana was in. Okay, granted she wasn’t really that close to the flames but it was fun to go beyond mere posing and edge towards ‘acting’. Am I making sense?

Hopefully I can share more photos from the shoot with you guys soon, in the mean time, leave me a comment and tell me what you think ^_^